

Over the years, Windows has included many programs, like WordPad, that went unnoticed by many users. This surprisingly powerful text editor with useful tools allowed users to create fairly advanced text files. We say “was” because Microsoft decided to eliminate WordPad at the end of 2023 to encourage people to switch to Office.
It’s important to note that WordPad was never intended to be a full-featured text editing tool like Word. It lacked many of Word’s advanced features. However, it was a handy tool for basic text editing, working offline, and completely free.
Although WordPad has been removed in Windows 11, there are still ways to bring it back. Here’s how you can recover and use it again in the latest version of Microsoft’s operating system:
Steps to Get WordPad Back in Windows 11
As mentioned earlier, WordPad was a great alternative for writing texts quickly and easily, though it wasn’t ideal for creating complex and professional documents. If you want to bring back WordPad to Windows 11, copy some files and resources from a previous version of Windows 11 to your current installation.
Here’s how you can recover WordPad in Windows 11:
Manually Reinstall WordPad (For Older Versions)
If you’re using an older version of Windows 11 (before 23H2), you can re-enable WordPad:
- Open Settings (Win + I).
- Go to Apps > Optional Features.
- Click Add a feature.
- Search for WordPad and select it.
- Click Install and restart your PC if needed.
Note: Microsoft has completely removed WordPad; this method won’t work if you’re on Windows 11 23H2 or later.
Copy WordPad from an Older Windows Installation
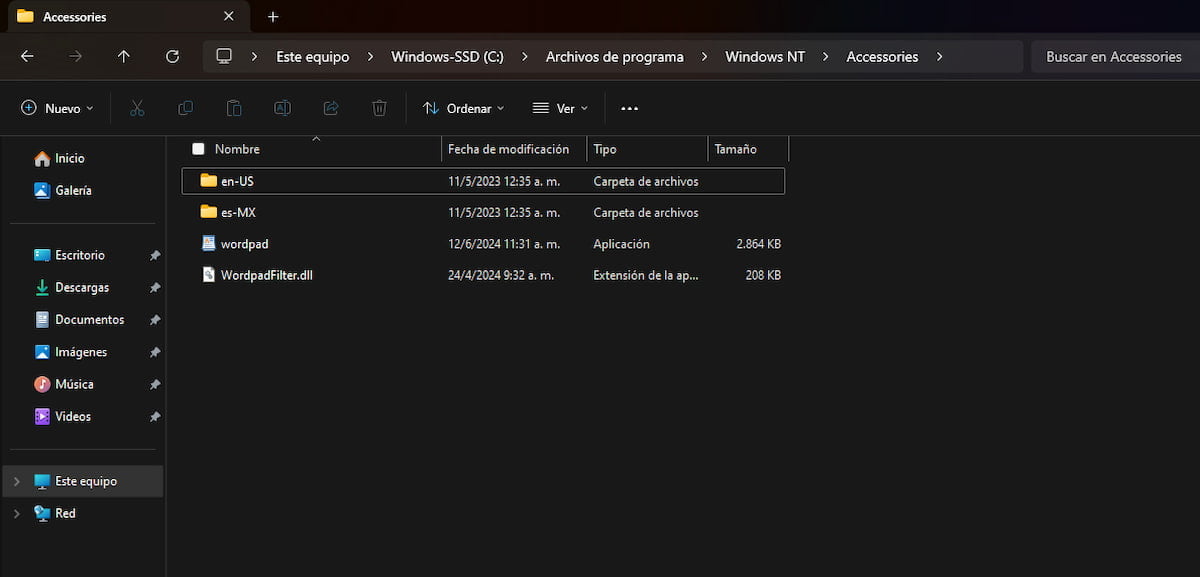
- If you have Windows 11 version 23H2 or an earlier version, navigate to: `C:\Program Files\Windows NT\Accessories`.
- Look for three files: `wordpad.exe,` `WordPadFilter.dll,` and a localization folder for your region.
- Copy `wordpad.exe,` `WordPadFilter.dll,` and the appropriate localization folder. If you have more than one language pack installed, there will be multiple localization folders.
- Paste these files into a folder that you can easily access.
- Right-click on the executable `wordpad.exe,` select “More options” in the context menu, then click “Send to” and choose “Desktop.”
- This will create a shortcut for the WordPad executable.
- Copy or cut the shortcut you created and paste it into the path: `C:\ProgramData\Microsoft\Windows\Start Menu\Programs`.
- Open the Start menu in Windows 11 and click “All applications.”
- Scroll to the end, and you will see the WordPad program listed.
- You can pin it to the taskbar or start menu for easier access.
By following these simple steps, you can recover the WordPad program in Windows 11 and continue to use it for your text editing needs.
While recent Windows 11 updates have removed WordPad as a default application, many users still search for “WordPad download” options to restore this familiar tool.
Unlike third-party alternatives that require external downloads, WordPad can be easily reinstalled through Windows’ built-in Optional Features menu, eliminating the need to download potentially risky software from unofficial sources.
This native installation method ensures you get the authentic Microsoft WordPad experience with its rich text formatting capabilities, image insertion, and document compatibility-without consuming significant system resources or requiring an internet connection for a separate download.
Extract WordPad from Windows ISO or Setup Media
If you don’t have another machine with WordPad, but you have an ISO of Windows 11 version 23H2 or earlier (or any Windows setup media that still includes WordPad), you can:
- Mount the ISO or open it using a tool that lets you browse the contents.
- Navigate to the relevant folder that holds WordPad files (similar path:
\Program Files\Windows NT\Accessories\...). - Copy out
wordpad.exe, the.dlland the language (.mui) file. - Then follow similar steps: transfer to the target PC, place in the proper folder, create shortcuts, etc.
This method is mentioned in Microsoft’s Q&A forums as the only viable option to restore WordPad now that it’s removed
Wordpad Alternative You Can Use Instead
If restoring WordPad seems too much work or starts to have issues, there are good alternatives:
- LibreOffice Writer – Free, full-featured, supports rich text, images, and more advanced formatting.
- Word for the web (Microsoft 365 online) – Has many features of Word; accessible via browser.
- Other lighter RTF editors – There are simpler apps/third-party tools that mimic WordPad’s functionality.
WordPad’s removal in Windows 11 version 24H2 has disappointed many users who found it useful for light document editing. Fortunately, with some work, it is still possible to restore WordPad by copying files from earlier Windows installations or ISOs. If that’s not viable, there are good alternatives available.
If you want, I can send you a downloadable ZIP file containing just the WordPad files needed (from a safe source) and a script to set it up automatically, so you can restore it more easily. Do you want me to prepare that for you (keeping safety in mind)?


