
Our modern world is constantly bombarded with cell phone and computer notifications. While these notifications can help you stay updated and connected, they can also become a significant source of distraction.
Recognizing this, Microsoft has introduced a helpful feature called “Focus Assist” in Windows 11, their latest operating system. With Focus Assist, users can selectively block unnecessary notifications that can hinder their focus when they need it the most. It’s a fantastic tool for maintaining productivity and concentration.
If you’re wondering how to set up and use Focus Assist, I’ve got you covered! Just follow the steps below to get started:
How to Use Focus Assist in Windows 10
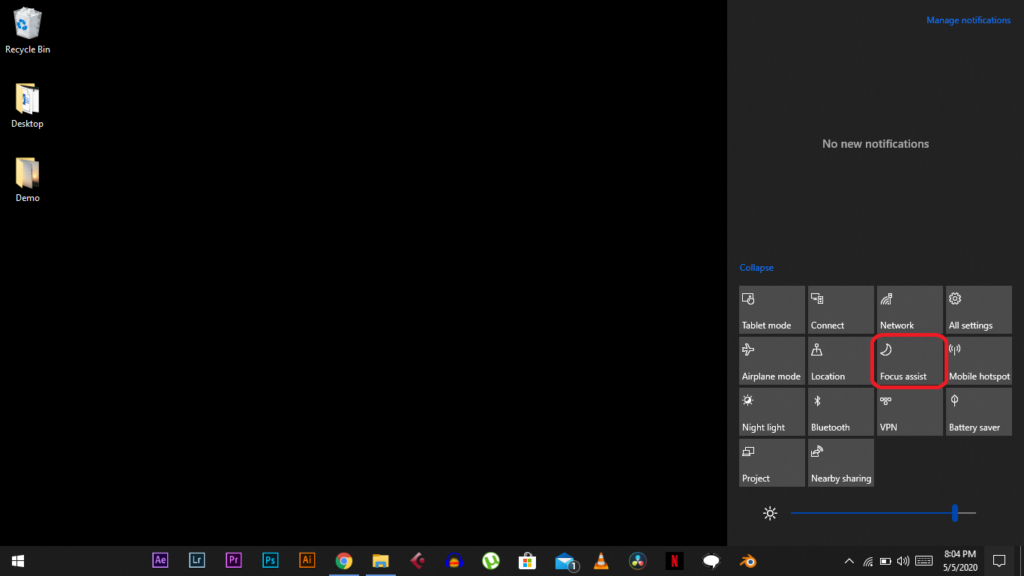
1. Click the “Network, volume, and battery” icon in the bottom right corner to open the “Quick settings” panel.
2. With the menu open, click “Focus assist” to enable it.
3. The first option will only activate the alarms programmed on the computer. Click once more on the icon to change it again.
4. Only notifications configured as priority will be displayed for this mode. If you want to disable the “Focus assist,” click again on the indicated icon.
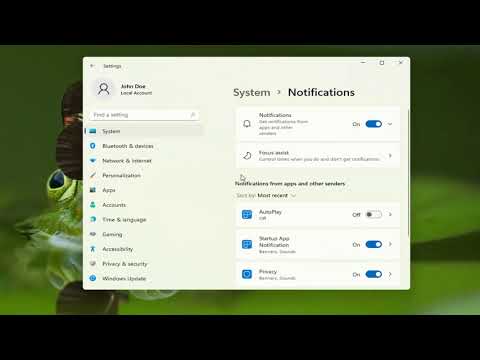
5. To configure priority notifications, access the “Start” menu and click on “Settings” or use the “Windows + I” command.
6. Go to the “System” tab on the left menu and click “Focus Assist.”
7. Check one of the options or select automatic rules in the bottom corner. To create priority notifications, click on “Customize Priority List.”
8. Choose whether you want to receive notifications from calls, reminders, people (add contacts) or from which apps.
You can now use the Windows 10 Focus Assist.
What is Focus Assist in Windows 10?
Focus Assist is a feature in Windows 11 that helps you stay productive and minimizes distractions by temporarily suppressing or blocking notifications, alerts, and other interruptions.
How does Focus Assist work?
Focus Assist can be customized to activate during specific times automatically or when you’re using certain applications or in full-screen mode. It can also be manually enabled or disabled as needed. When Focus Assist is active, it silences notifications and alerts, allowing you to focus on your tasks.
How do I access Focus Assist settings in Windows 10?
To access Focus Assist settings, go to “Settings” by clicking the Start button and then the gear icon. In the Settings menu, select “System” and then “Focus Assist.” Here, you can configure the various options and preferences related to Focus Assist.
Can I customize the priority list for notifications during Focus Assist?
Yes, you can customize the priority list for notifications during Focus Assist. In the Focus Assist settings, you can define which contacts, apps, or specific people should be allowed to break through the silence and notify you even when Focus Assist is enabled.
Will calls or alarms still come through during Focus Assist?
By default, calls and alarms are not blocked during Focus Assist. Windows 11 ensures that important calls and alarms can still reach you even when Focus Assist is active, helping you stay aware of crucial notifications.
Can I review missed notifications during Focus Assist?
Yes, you can review missed notifications when Focus Assist is turned off. Once you disable Focus Assist, any suppressed or blocked notifications during its activation will be visible in the notification center for you to review.
Can I schedule specific times for Focus Assist to activate automatically?
Absolutely! Windows 11 allows you to schedule specific times for Focus Assist to activate automatically. In the Focus Assist settings, you can define the preferred times and days when you want Focus Assist to be enabled, ensuring uninterrupted work or leisure hours.
Does Focus Assist sync across multiple Windows 11 devices?
Suppose you have multiple Windows 11 devices linked to the same Microsoft account. In that case, the Focus Assist settings and preferences can sync across those devices, providing a consistent experience tailored to your needs.


