

Windows 11 regularly installs updates to enhance security, add features, and fix bugs. While these updates are important, sometimes a newly installed update may cause system instability, application crashes, driver conflicts, or performance issues. In such cases, uninstalling the problematic update may help restore your PC’s stability.
Is your PC acting up after installing a new Windows update? If so, rolling back the update could be a simple and effective fix. Sometimes, updates come with bugs and errors that can negatively impact your experience with the operating system.
Things to Know Before Uninstalling Windows Updates
- Security risk: Updates often include patches for vulnerabilities. Removing them may expose your system to threats.
- Temporary solution: Uninstalling an update may fix issues in the short term, but Microsoft may eventually reinstall it automatically.
- System restore: Always create a restore point or back up your data before uninstalling critical updates.
- Different types of updates:
- Quality updates (monthly cumulative updates with fixes and security improvements).
- Feature updates (major version upgrades, such as 22H2 or 23H2,24H2).
- Driver updates (hardware-specific updates).
Ways to uninstall a Windows Update:
- Through the Control Panel, you can manage and remove updates directly from your system settings.
- Using Safe Mode & Recovery Options – Restart your computer in Safe Mode to uninstall problematic updates more effectively.
In this guide, we’ll walk you through both methods step by step, helping you restore stability to your PC.
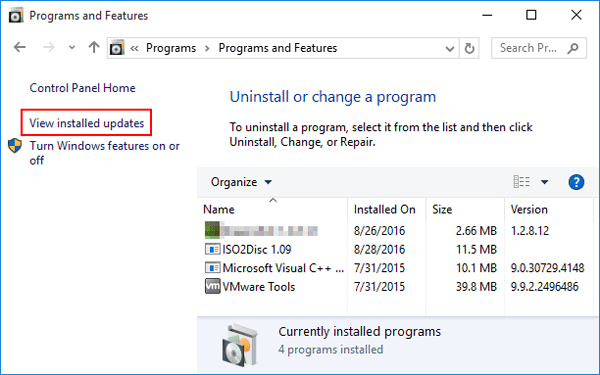
How to Roll Back a Windows Update from the Control Panel
- In the search bar, search for “Control Panel”;
- Then click on the “Programs” category.
- Then click on “Programs and Features”;
- On the right side, click on “View installed updates”;
- On this page, double-tap an update to uninstall.
This feature is available for Windows 7/10 versions or older. However, it is also possible to uninstall updates without access to the Desktop. See how to do it!
Uninstall Windows Updates via Settings in Windows 11
This is the simplest way to remove recent updates.
- Press Windows + I to open the Settings app.
- Go to:
System > Windows Update > Update history. - Scroll down and click Uninstall updates under Related settings.
- A list of installed updates will appear.
- Select the update you want to uninstall.
- Click Uninstall and confirm.
Tip: Updates are listed with their KB (Knowledge Base) numbers (e.g., KB5023706). If you know the KB number of the problematic update, search for it directly.
Use Command Prompt or PowerShell
For advanced users, the command line provides a faster method.
- Press Windows + S, type
cmd, right-click Command Prompt, and select Run as administrator. - Type:
wmic qfe list brief /format:table This will display a list of installed updates with their KB numbers.- Run the following command, replacing
KBxxxxxxxwith the update number: wusa /uninstall /kb:xxxxxxx- After completion, reboot to apply changes.
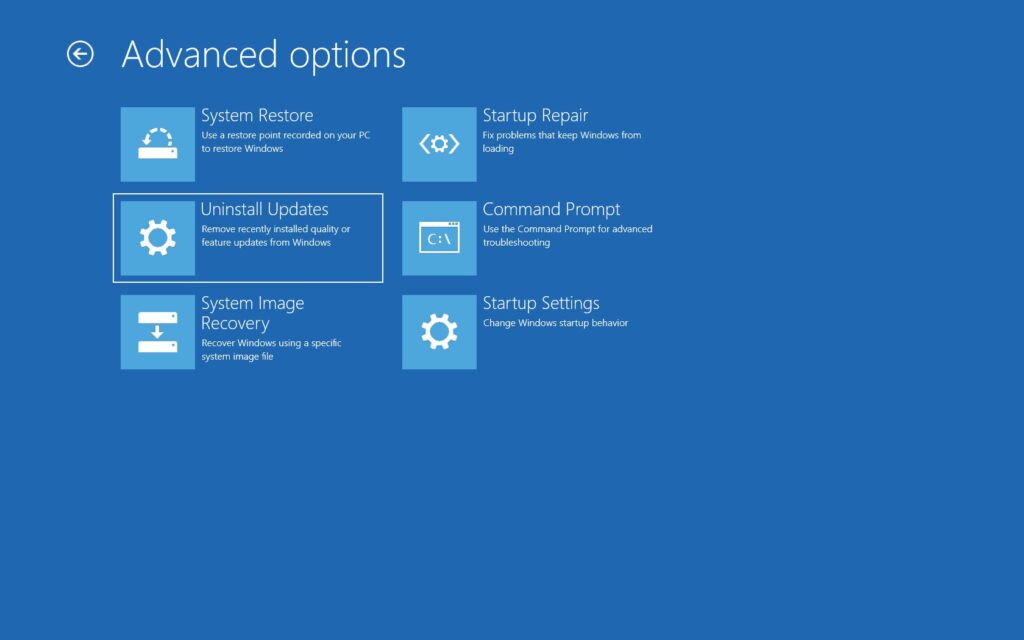
How to Uninstall Updates from Windows Update via Recovery Mode
In this mode, you can manage your updates and, if necessary, also return to a recent restore point:
- Restart your computer by pressing the “Shift” key.
- Then click on “Troubleshooting”;
- Then click on “Advanced Options”;
- After that, click on “Uninstall Updates”;
- Finally, select whether to uninstall your latest quality update or the latest feature update.
Uninstall Feature Updates (Major Upgrades)
If a major feature update (like upgrading to Windows 11 23H2,24H2) causes issues, you can roll back to the previous version.
- Open Settings > System > Recovery.
- Under Recovery options, select Go back (only available for 10 days after the update).
- Follow on-screen instructions to revert to your earlier version.
Preventing Reinstallation of Windows Updates
Windows Update may try to reinstall the same update. To block this:
- Download the “Show or Hide Updates” Troubleshooter Tool from Microsoft’s website.
- Run it and select the problematic update.
- Choose Hide update to prevent it from reinstalling automatically.
Uninstalling updates on Windows 11 is sometimes necessary when they cause system instability, crashes, or performance problems. Microsoft generally recommends keeping updates installed for security reasons, but with the right precautions, you can safely roll back problematic patches.
Use Settings or Control Panel for simple removals, Command Prompt/PowerShell for advanced control, and Recovery options if your PC becomes unbootable. Always weigh the risks before uninstalling and keep your system backed up for safety.
If removing the update doesn’t resolve the issue, you can restore your system to a previous state using a system restore point. This option is available under Advanced Options in Windows recovery settings and allows you to revert your system to an earlier version before the problematic update was installed.
- Microsoft Developing Cloud-Based Windows Update Rollback Feature
- How to Manage Clipboard History in Windows 10
- How to Download Windows 10 ISO
- Disable Fast Startup in Windows 10


