

AdGuard Public DNS is a top choice for individuals seeking a safer browsing experience online. By opting for this alternative server, you can enjoy the benefits of ad and tracker blocking and the added advantage of filtering out malicious or inappropriate websites.
What sets AdGuard apart from other public DNS servers, like Google’s, is its robust security features and the ability to remove ads seamlessly within a single platform. Additionally, the installation process is incredibly convenient.
Rather than manually configuring the settings, you can download AdGuard, which automatically makes all the necessary adjustments.
The AdGuard app is compatible with Android, Windows, iOS, and macOS, making it accessible across various devices. Below, you’ll find step-by-step instructions on installing and utilising this powerful tool to enhance your online browsing experience.
How to install AdGuard and use DNS
- On your computer, go to adguard.com and download AdGuard. On mobile phones, search for the app on the Google Play Store or App Store.
- Authorise the use of the software and follow the installation instructions. It is only necessary to choose the directory where the files will be stored.
- After installing it, open AdGuard and choose between custom protection or the standard version.
- Confirm that AdGuard is enabled to use all DNS features. The app displays the number of ads and trackers blocked during protection.
- Once setup is complete, you can use the internet in any browser and enjoy the software’s features.
Using AdGuard Public DNS Manually
Apart from using the AdGuard software, you can manually configure and use AdGuard’s public DNS addresses without installing additional programs. To do this, you’ll follow the standard configuration steps for setting up a DNS server.
The step-by-step process is similar to configuring Google’s public DNS, as previously discussed. The only difference is entering the server addresses under TCP/IPv4. You can choose from the following options in the DNS server field: [List the available DNS server address options here].
You can manually utilise AdGuard’s public DNS service by inputting one of these addresses. This gives you the flexibility to customise your DNS settings to your preferences.
- Default server (blocks ads and trackers): 94.140.14.14 and 94.140.15.15;
- Server without filters (does not block trackers or ads): 94,140,14,140 and 94,140,14,141;
- Family protection server (blocks ads, trackers, and adult content sites and includes safe search features): 94.140.14.15 and 94.140.15.16.
In the TCP/IPv6 protocol properties, it is necessary to enter the respective numbers for each server:
- Default server (blocks ads and trackers): 2a10:50c0::ad1:ff and 2a10:50c0::ad2:ff;
- Server without filters (does not block trackers or ads): 2a10:50c0::1:ff and 2a10:50c0::2:ff;
- Family protection server (blocks ads, trackers, and adult content sites and includes safe search capabilities): 2a10:50c0::bad1:ff and 2a10:50c0::bad2:ff.
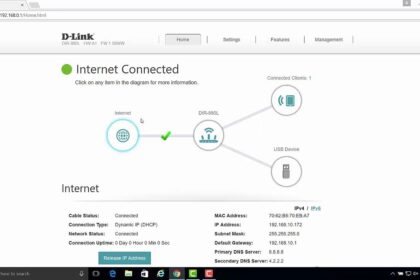
You can use these DNS addresses on any computer, cell phone, or router settings. To confirm that the services are working, go to adguard.com/en/test.html and perform an automatic check in the browser.


