
Apple’s iOS 26 introduces a much more streamlined and powerful way for parents to create and manage Child Accounts, giving families stronger protections and finer control over what children and teens can access on their devices. The update is designed to reduce setup friction while ensuring kids have an online experience that matches their age and maturity level.
Once a Child Account is created, many safety features are enabled automatically. These include privacy-focused age sharing with apps, smarter App Store filtering, expanded content ratings, and new communication controls. The idea is to let parents set guardrails quickly, then fine-tune them over time as their child grows.
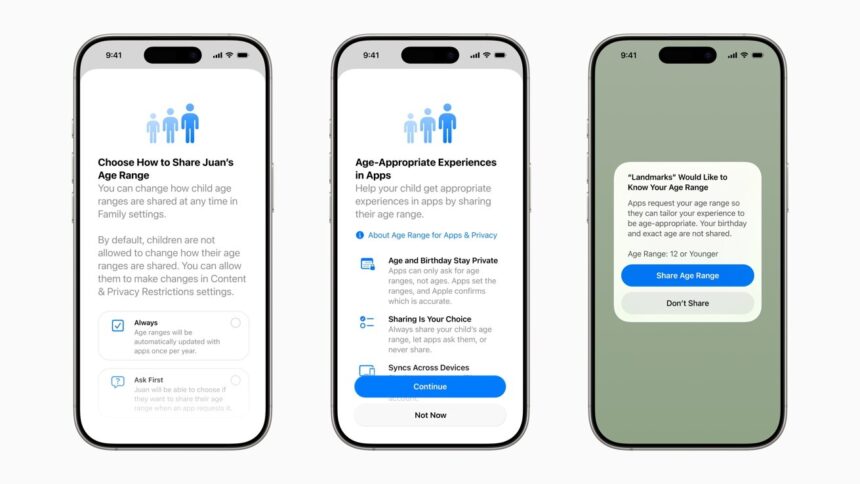
What’s new with Child Accounts in iOS 26
With iOS 26, Apple focused on three major improvements:
- Faster setup – Creating a Child Account now takes fewer steps and works consistently across iPhone, iPad, and Mac.
- Smarter age awareness – Apps can receive a child’s age range without accessing personal details, allowing for better age-appropriate experiences.
- Stronger teen protections – Users aged 13 to 17 now benefit from expanded safeguards against explicit content, unwanted contact, and risky interactions.
Apple has also updated its App Store age ratings, adding clearer distinctions such as 13+, 16+, and 18+. This allows automatic filtering to be far more precise than before.
How to create a Child Account
Before starting, make sure:
- Your devices are updated to the latest version of iOS, iPadOS, or macOS
- You are the Family Sharing organizer or a registered parent/guardian
- You’re prepared to verify your identity (credit card or ID in Apple Wallet may be required)
Create a Child Account on iPhone or iPad
- Open Settings
- Tap Family
- Tap Add Member in the top-right corner
- Select Create Child Account
- Tap Continue
- Enter the child’s name and date of birth
- Follow the on-screen steps to complete setup
Apple may request adult verification before the account becomes active.
Create a Child Account on Mac
- Click the Apple menu (top left)
- Open System Settings
- Select Family
- Click Add Member
- Choose Create Child Account
- Follow the on-screen instructions
Important: Age requirements vary by country. In the U.S., Child Accounts are required for children 13 and under. In other regions, the cutoff may be 14, 15, or even 16.
Enabling deeper child protection controls
While the initial setup activates basic safeguards, parents can customise protections in much more detail using Screen Time and Content & Privacy Restrictions.
Turn on Content & Privacy Restrictions
- Open Settings
- Tap Screen Time
- Select your child’s name under Family
- Tap Content & Privacy Restrictions
- Enter your Screen Time passcode
- Toggle the feature On
Once enabled, you can manage nearly every aspect of the device experience.
Setting Screen Time limits
Screen Time helps prevent overuse and encourages healthier device habits.
- Open Settings
- Tap Screen Time
- Choose your child’s name
- Select the category you want to adjust
Available options include:
- Downtime – Schedule periods when apps are unavailable
- App Limits – Set daily limits for apps or entire categories (social media, games, etc.)
- Always Allowed – Choose apps that remain accessible at all times (Phone cannot be disabled, but contacts can be restricted)
- Screen Distance – Uses Face ID to ensure the device is held at a safe viewing distance
Turning built-in apps and features on or off
For younger users, disabling unnecessary system apps can be very effective.
- Open Settings
- Tap Screen Time
- Go to Content & Privacy Restrictions
- Tap Allowed Apps & Features
- Toggle off apps like Camera, FaceTime, Wallet, or others as needed
Preventing App Store and in-app purchases
To avoid accidental or unauthorized spending:
- Open Settings
- Tap Screen Time
- Select Content & Privacy Restrictions
- Tap iTunes & App Store Purchases
- Set purchases to Don’t Allow or require approval
This applies to app downloads, subscriptions, and in-app purchases.
Restricting gaming features
Game Center controls let parents manage how children interact with others in games.
- Open Settings
- Tap Screen Time
- Go to Content & Privacy Restrictions
- Tap App Store, Media, Web & Games
- Select Game Center
- Set rules for multiplayer gaming, messaging, and friend requests
These settings apply only to games that use Game Center.
Blocking explicit content and setting ratings
To ensure children only see age-appropriate media:
- Open Settings
- Tap Screen Time
- Select Content & Privacy Restrictions
- Tap App Store, Media, Web & Games
- Adjust restrictions for music, movies, TV, books, apps, and web content
You can also:
- Block adult websites automatically
- Create approved or blocked website lists
- Restrict web access to approved sites only
Managing Apple Intelligence and Siri access
With Apple Intelligence and the updated Siri playing a larger role in iOS 26, parents may want to limit access-especially while these tools are still evolving.
- Open Settings
- Tap Screen Time
- Go to Content & Privacy Restrictions
- Tap Intelligence & Siri
- Toggle off any features you want to restrict
iOS 26 gives parents a more balanced approach: quick setup for immediate safety, plus detailed controls for long-term flexibility. Whether you’re setting up a first device for a child or refining protections for a teenager, Apple’s updated Child Account system makes it easier to manage digital boundaries without constant micromanagement.
The result is a safer, more age-appropriate experience-while still letting kids grow into their technology over time.


