
In this post, I’ll walk you through how to create shortcuts for files, folders, or applications using a PowerShell script. This approach is especially useful when you need to deploy shortcuts at scale-whether across multiple machines or for all users in an Active Directory environment.
I recently ran into a situation where an application shortcut needed to appear on every domain user’s desktop. Manually creating shortcuts or relying on traditional methods quickly proved impractical. After testing several options, a PowerShell-based solution proved the most efficient, flexible, and easy to maintain.
How shortcut creation works in PowerShell
PowerShell doesn’t have a native cmdlet specifically designed for creating shortcuts. Instead, it uses the WScript.Shell COM object, which exposes the tools needed to generate and configure .lnk shortcut files.
By leveraging the $WshShell object, you can define the shortcut’s target path, icon, working directory, and even command-line arguments. This makes it ideal for scripted deployments, login scripts, or group-based automation.
Basic PowerShell script to create a shortcut
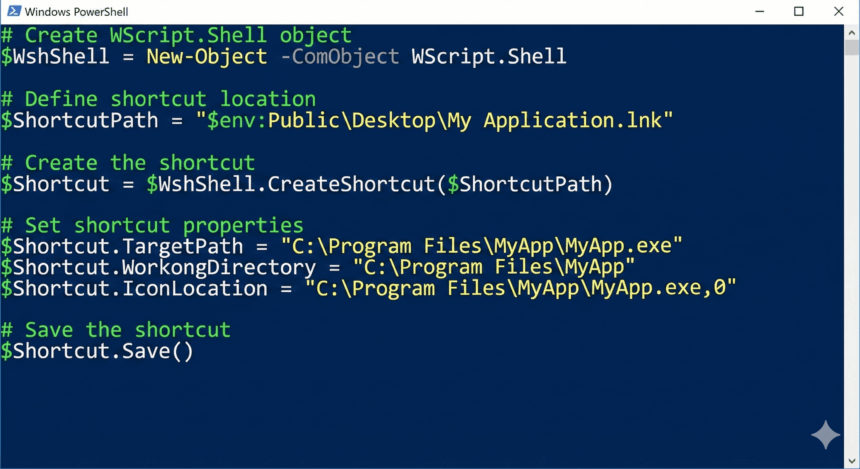
Below is a simple example that creates a desktop shortcut for an application. You can adapt the target path and destination as needed for files, folders, or different deployment scenarios.
# Create WScript.Shell object
$WshShell = New-Object -ComObject WScript.Shell

# Define shortcut location
$ShortcutPath = "$env:Public\Desktop\My Application.lnk"

# Create the shortcut
$Shortcut = $WshShell.CreateShortcut($ShortcutPath)

# Set shortcut properties
$Shortcut.TargetPath = "C:\Program Files\MyApp\MyApp.exe"
$Shortcut.WorkingDirectory = "C:\Program Files\MyApp"
$Shortcut.IconLocation = "C:\Program Files\MyApp\MyApp.exe,0"

# Save the shortcut
$Shortcut.Save()
This script places a shortcut on the Public Desktop, making it visible to all users on the machine. For domain-wide deployments, the same logic can be incorporated into logon scripts, startup scripts, or configuration management tools.
Why this method works well in enterprise environments
Using PowerShell for shortcut creation offers several advantages:
- Easily scalable across many systems
- Simple to modify or redeploy when paths change
- Compatible with domain scripts and automation tools
- No manual user interaction required
For administrators managing large environments, this method provides a reliable way to ensure consistency without spending hours on repetitive tasks.
Below is a basic PowerShell script that demonstrates how to create a shortcut for a specified target (file, folder, or application):Let’s break down the script:
$SourcePath: This variable holds the path to the target file, folder, or application for which you want to create a shortcut. Replace"C:\Path\To\TargetFile.exe"with the actual path of your target.$ShortcutPath: This variable specifies the path and name of the shortcut file you want to create. In this example, it creates a shortcut namedShortcutName.lnkon the Public Desktop. Modify the path and name as per your requirements.$WShell = New-Object -ComObject WScript.Shell: This line creates a new instance of theWScript.ShellCOM object, which provides methods and properties for creating and manipulating shortcuts.$Shortcut = $WShell.CreateShortcut($ShortcutPath): This line creates a new shortcut object at the specified$ShortcutPathlocation.$Shortcut.TargetPath = $SourcePath: This line sets the target path of the shortcut to the$SourcePathvariable, which points to the file, folder, or application you want to create a shortcut for.$Shortcut.Save(): This line saves the shortcut object to the specified$ShortcutPathlocation, creating the shortcut file.
After running this script, you should find a new shortcut created at the specified $ShortcutPath location, which will open the target file, folder, or application when double-clicked.
You can easily modify this script to create shortcuts for multiple targets or distribute the shortcuts to specific user desktops or network locations using additional PowerShell commands and techniques.
PowerShell Create Shortcut to File
Let’s say you want to create a shortcut for Google Chrome using a PowerShell script. Here’s an example script that demonstrates how to create a shortcut for Google Chrome on the desktop:
# Path to the Google Chrome executable
$SourceFilePath = "C:\Program Files (x86)\Google\Chrome\Application\chrome.exe"

# Path and name for the new shortcut
$ShortcutPath = "$env:PUBLIC\Desktop\Google Chrome.lnk"

# Create a WScript.Shell object
$WShell = New-Object -ComObject WScript.Shell

# Create a new shortcut object
$Shortcut = $WShell.CreateShortcut($ShortcutPath)

# Set the target path for the shortcut
$Shortcut.TargetPath = $SourceFilePath

# Set the description for the shortcut
$Shortcut.Description = "Google Chrome Web Browser"

# Set the working directory for the shortcut
$Shortcut.WorkingDirectory = "C:\Program Files (x86)\Google\Chrome\Application"

# Set the icon for the shortcut
$Shortcut.IconLocation = "$SourceFilePath,0"

# Save the shortcut
$Shortcut.Save()
Here’s what the script does:
$SourceFilePathspecifies the full path to the Google Chrome executable (chrome.exe). Adjust the path according to your installation location.$ShortcutPathspecifies the path and name for the new shortcut file. In this example, the shortcut will be created on the Public Desktop with the name “Google Chrome.lnk”.- The script creates a new instance of the
WScript.ShellCOM object, which provides methods and properties for creating and manipulating shortcuts. $Shortcut = $WShell.CreateShortcut($ShortcutPath)creates a new shortcut object at the specified$ShortcutPathlocation.$Shortcut.TargetPathsets the target path of the shortcut to the$SourceFilePathvariable, which points to the Google Chrome executable.$Shortcut.Descriptionsets a description for the shortcut.$Shortcut.WorkingDirectorysets the working directory for the shortcut, which is the directory that Google Chrome will start in when launched from the shortcut.$Shortcut.IconLocationsets the icon for the shortcut using the path to the Google Chrome executable and the icon index (0 for the first icon in the executable).$Shortcut.Save()saves the shortcut object to the specified$ShortcutPathlocation, creating the shortcut file.
After running this script, you should find a new shortcut named “Google Chrome.lnk” on your Public Desktop. When you double-click this shortcut, it will launch Google Chrome.
Note: make sure you have the Windows Script Host (WSH) installed on your computer to run this script. If you encounter any issues, ensure that you have the required permissions and the paths specified in the script are correct.
PowerShell: Create a shortcut to a Folder.
Now, I’ll explain how to create a shortcut to a folder on the user’s desktop or on a remote computer using PowerShell.
Let’s consider that we need to create a shortcut for a folder located at D:\MyFolder and save the shortcut on the user’s desktop.
Here’s the PowerShell script to achieve this:
# Path to the folder for which you want to create a shortcut
$SourceFolderPath = "D:\MyFolder"

# Get the current user's desktop path
$DesktopPath = [Environment]::GetFolderPath("Desktop")

# Construct the shortcut path and name on the desktop
$ShortcutPath = Join-Path -Path $DesktopPath -ChildPath "MyFolder Shortcut.lnk"

# Create a WScript.Shell object
$WShell = New-Object -ComObject WScript.Shell

# Create a new shortcut object
$Shortcut = $WShell.CreateShortcut($ShortcutPath)

# Set the target path for the shortcut
$Shortcut.TargetPath = $SourceFolderPath

# Set the description for the shortcut
$Shortcut.Description = "Shortcut to MyFolder"

# Save the shortcut
$Shortcut.Save()
Here’s what the script does:
$SourceFolderPathspecifies the full path to the folder for which you want to create a shortcut.$DesktopPathretrieves the current user’s desktop path using the[Environment]::GetFolderPath("Desktop")method.$ShortcutPathconstructs the path and name for the new shortcut file on the desktop using aJoin-Pathcmdlet.- The script creates a new instance of the
WScript.ShellCOM object, which provides methods and properties for creating and manipulating shortcuts. $Shortcut = $WShell.CreateShortcut($ShortcutPath)Creates a new shortcut object at the specified$ShortcutPathlocation.$Shortcut.TargetPathsets the target path of the shortcut to the$SourceFolderPathvariable, which points to the folder you want to create a shortcut for.$Shortcut.Descriptionsets a description for the shortcut.$Shortcut.Save()saves the shortcut object to the specified$ShortcutPathlocation, creating the actual shortcut file.
After running this script, you should find a new shortcut named “MyFolder Shortcut.lnk” on your desktop. When you double-click this shortcut, it will open the D:\MyFolder folder.
To create a shortcut on a remote computer, you can use PowerShell remoting or run the script on the remote machine with PsExec or similar tools. The script will create the shortcut on the desktop of the user logged in to the remote computer.
Make sure to replace D:\MyFolder with the actual path to the folder for which you want to create a shortcut, and modify the shortcut name if desired.
- Install the Microsoft Graph PowerShell Module
- Terminate Script Using PowerShell Exit Script
- Delete File If Exists in Powershell Using Remove-Item


