
Windows 11 includes multiple built-in security layers designed to protect your system from modern cyber threats. One such feature is Exploit Protection, which helps block malicious software from abusing vulnerabilities in applications and system processes.
While this protection is enabled by default and should usually remain active, certain legacy applications, development tools, or specialised software may fail to run correctly because of these mitigations.
This guide explains what Exploit Protection is, why you might need to disable it, and how to safely disable specific exploit mitigations using Windows Security, PowerShell, and the Group Policy Editor.
What is Exploit Protection in Windows 11?
Exploit Protection is a built-in Windows security feature that helps defend your system against malicious software that attempts to exploit vulnerabilities in applications or system processes. Instead of relying on traditional signature-based detection, Exploit Protection focuses on blocking how attacks work—for example, preventing malicious code injection, unsafe memory usage, or unauthorised execution.
This feature evolved from the Enhanced Mitigation Experience Toolkit (EMET), which was previously offered as a standalone security utility. Microsoft later integrated EMET’s capabilities directly into Windows, making them accessible through the Windows Security interface under Exploit Protection settings.
Exploit Protection applies in two ways:
- System-wide mitigations – Affect all applications running on the device
- Program-specific mitigations – Apply only to selected executables
This flexible design allows users to maintain strong protection while still addressing compatibility problems with specific software.
Things to Know Before Disabling Exploit Protection
- There is no single master switch to completely turn off Exploit Protection.
- You can only disable individual mitigations, either system-wide or per application.
- Disabling protections reduces your overall system security.
- It is strongly recommended to disable mitigations only for specific apps and only when absolutely necessary.
1. Disable Exploit Protection Using Windows Security
This is the most user-friendly method and is ideal for disabling mitigations for a single application.
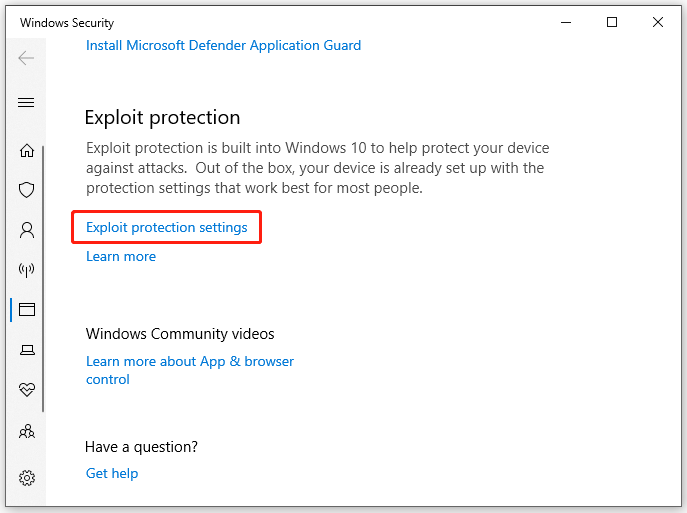
- Click the Start button and type Windows Security in the search bar.
- Open Windows Security from the results.
- In the left panel, select App & browser control.
- Scroll down and click Exploit protection settings under the Exploit protection section.
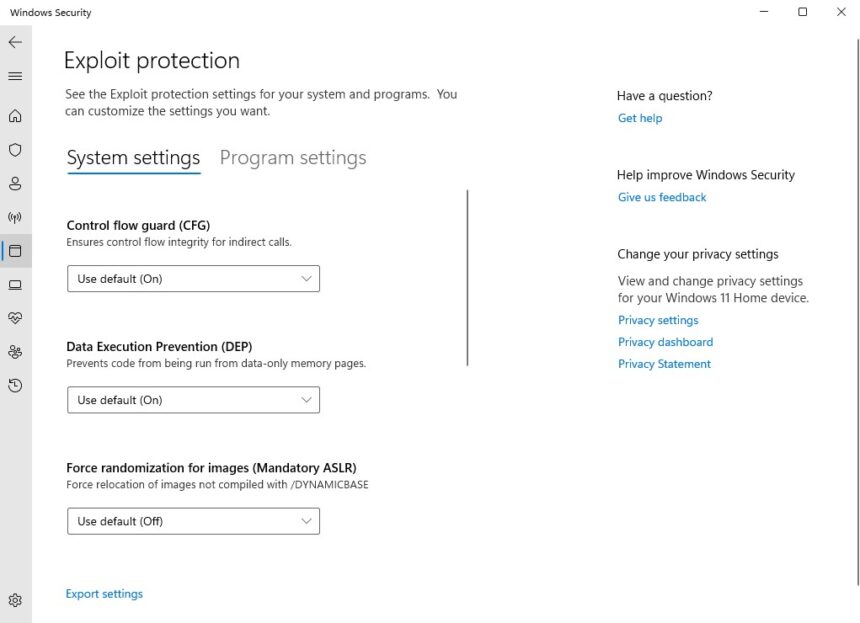
You will now see two tabs:
- System settings
- Program settings
Disable Exploit Protection for a Specific App
- Switch to the Program settings tab.
- Click Add program to customise, then choose:
- Add by program name, or
- Choose exact file path
- Select the executable (.exe) file of the application causing issues.
A configuration window will open showing available mitigations, such as:
- Arbitrary Code Guard (ACG) – Blocks untrusted code execution
- Control Flow Guard (CFG) – Prevents abnormal code execution paths
- Data Execution Prevention (DEP) – Blocks code execution in non-executable memory
- Block low integrity images – Stops unsafe image loading
- Block remote images – Prevents loading images from remote sources
Applying Overrides
- Check the Override system settings for the mitigation you want to disable.
- Once the toggle becomes active, switch it Off.
- Click Apply and confirm the User Account Control prompt.
Restart the affected application and test it. If the issue persists, you may review and adjust other mitigations one at a time.
Best Practices
- Do not disable all mitigations unless absolutely required.
- Re-enable protections after testing or troubleshooting.
- Keep a record of changes for future reference.
2. Disable Exploit Protection Using PowerShell
This method is suitable for advanced users and administrators who prefer command-line tools.
View Current System Mitigations
- Right-click Start and choose Terminal (Admin).
- Approve the User Account Control prompt.
- Run the following command:
Get-ProcessMitigation -System
This displays all active exploit mitigations applied system-wide.
Disable a Specific Mitigation System-Wide
To disable Control Flow Guard globally:
Set-ProcessMitigation -System -Disable ControlFlowGuard
Disable a Mitigation for a Specific Application
To disable ForceRelocateImages for Notepad only:
Set-ProcessMitigation -Name notepad.exe -Disable ForceRelocateImages
Final Step
Restart your computer to ensure the changes take effect.
Warning: System-wide changes affect all applications and should be used cautiously.
3: Disable Exploit Protection Using Group Policy Editor
This method is intended for professional, enterprise, or education environments where settings need to be applied across multiple PCs.
Group Policy does not directly enable or disable Exploit Protection. Instead, it uses an XML configuration file that defines which mitigations are enabled or disabled.
1. Create the XML Configuration File
- On a reference PC, open Windows Security.
- Go to App & browser control > Exploit protection settings.
- Customise system or program mitigations as needed.
- Click Export settings and save the XML file.
2. Deploy the XML via Group Policy
- Press Win + R, type
gpedit.msc, and press Enter. - Navigate to:
Computer Configuration
> Administrative Templates
> Windows Components
> Windows Security
> Exploit Protection
- Open Use a common set of Exploit Protection settings.
- Select Enabled.
- Under Options, enter the path or URL to the XML file.
- Click Apply and OK.
Run the following command to apply the policy immediately:
gpupdate /force
The system will import the XML file and apply the defined mitigations.
How to Disable Arbitrary Code Guard (ACG) in Windows 11
Arbitrary Code Guard (ACG) is a memory protection feature that blocks unauthorised code execution. While it enhances security, some applications may fail to function correctly with ACG enabled.
Disable ACG via Windows Security
- Open Windows Security.
- Go to App & browser control > Exploit protection settings.
- Open the Program settings tab.
- Add the executable file.
- Locate Arbitrary Code Guard (ACG).
- Check Override system settings and turn it Off.
- Click Apply and restart your PC.
Group Policy (Advanced)
- Disable ACG on a reference system.
- Export the Exploit Protection XML.
- Deploy it using Group Policy as described earlier.
For executable-specific policies:
- Open Group Policy Editor.
- Navigate to:
Computer Configuration
> Administrative Templates
> System
> Mitigation Options
- Enable Process Mitigation Options.
- Click Show… under Options.
- Enter the executable name and the required mitigation bitmask.
- Apply the policy and restart.
Note: Microsoft does not officially document mitigation bitmask values, making this method suitable only for experienced administrators.
Where to Find Exploit Protection in Windows 11
Exploit Protection is located within the Windows Security app:
Windows Security → App & browser control → Exploit protection settings
From here, you can manage both system-wide and application-specific mitigations that help protect your PC from advanced malware and exploit-based attacks.
Exploit Protection is a powerful security layer that significantly reduces the risk of sophisticated attacks. While disabling certain mitigations can help resolve compatibility issues, it should always be done carefully and selectively. Whenever possible, re-enable protections after troubleshooting to maintain a strong security posture on your Windows system.
- How to install Microsoft Defender on Windows 11 and Android
- Customise Privacy settings in Windows 11
- Disable Windows 11 Recall AI Feature
- Remove AI Features in Windows 11


