
Did you know you can schedule messages on WhatsApp Web?
While the platform doesn’t currently offer a built-in feature for this, an effective workaround is available using a Google Chrome extension called Blueticks. This handy tool enables you to plan and send messages automatically, ensuring your chats are delivered exactly when you want — even if you’re away from your computer.
Below, we’ll walk you through everything you need to know about setting up and using this feature in detail.
Why Schedule Messages on WhatsApp Web?
Scheduling messages can be useful in many situations, such as sending birthday wishes on time, following up with clients, or sharing reminders with your team. Instead of remembering to send these manually, Blueticks automates the process, saving you time and ensuring your messages are always on time.
How to Schedule Messages on WhatsApp Web
Install the Blueticks Extension
- Open Google Chrome on your computer.
- Visit the Chrome Web Store and search for Blueticks WhatsApp Scheduler.
- Click Add to Chrome and confirm the installation.
- Once installed, you’ll see the Blueticks icon appear in your browser’s extensions area.
This extension integrates directly with WhatsApp Web, adding extra features such as message scheduling, automated replies, and bulk message sending.
Open WhatsApp Web
- Go to web.whatsapp.com on your browser.
- Scan the QR code using the WhatsApp app on your phone to link your account.
- Once connected, your chat list will load as usual.
Choose a Conversation
Navigate to the chat where you want to schedule a message. This can be an individual conversation or a group chat.
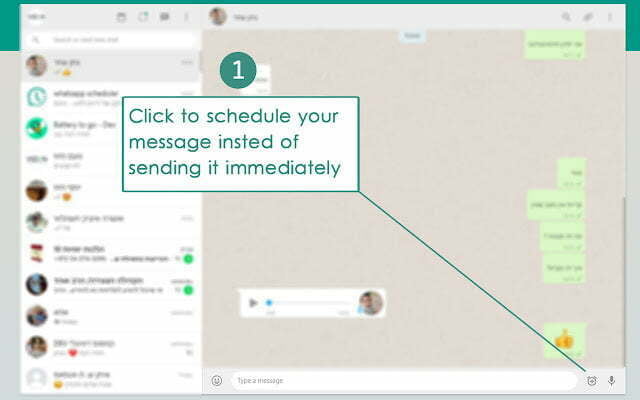
Set Up the Scheduled Message
- Look for a clock icon next to the audio recording button — this is added by Blueticks.
- Click on it to open the scheduling window.
- Type your message in the text box.
- Select the exact date and time you want the message to be sent.
- Once you’ve reviewed your message, click Schedule Send.
You’ll see a confirmation that your message has been scheduled successfully.
Managing Scheduled Messages
Blueticks also lets you view, edit, or delete scheduled messages before they’re sent.
- To check your upcoming messages, click on the Blueticks icon in your browser.
- From there, you can adjust the time, modify the message content, or cancel the schedule entirely.
This flexibility ensures you stay in control of your communications at all times.
Extra Tips for Better Use
- Stay logged in: Your WhatsApp Web tab should remain open at the scheduled time for the extension to work properly.
- Use responsibly: Avoid overusing automation for spam-like messages, as WhatsApp’s system may detect irregular activity.
- Great for professionals: If you use WhatsApp for business, Blueticks can help you maintain timely communication with clients or team members.
Scheduling messages on WhatsApp Web using the Blueticks Chrome extension is a simple yet powerful way to automate communication. Whether you’re sending reminders, greetings, or work updates, this feature ensures your messages reach the right people at the perfect time — even when you’re offline.
With just a few clicks, you can plan ahead, stay organised, and make WhatsApp work smarter for you.
- Schedule Automatic Messaging on Telegram
- Track People on WhatsApp with Live Location
- Use Two WhatsApp Accounts on Your iPhone


