
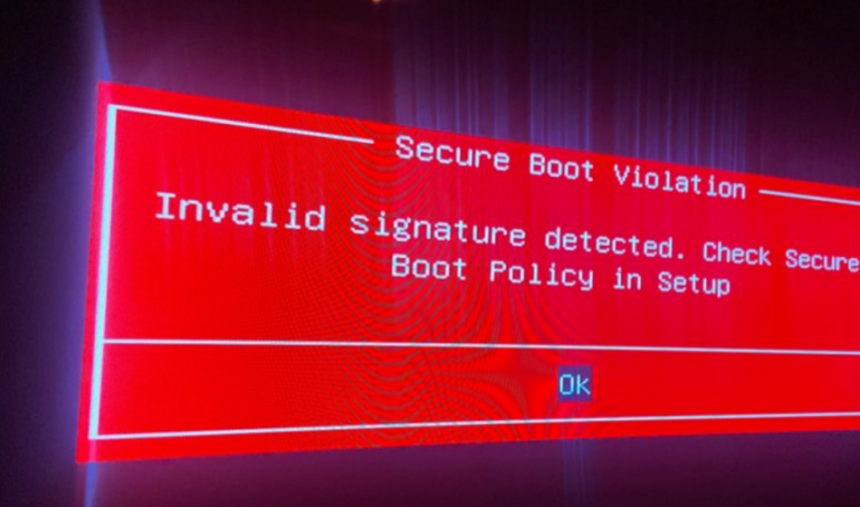
If your Windows PC suddenly refuses to boot and displays the message “Invalid Signature Detected. Check Secure Boot Policy in Setup”, the problem may be related to the Windows UEFI CA 2023 certificates stored in your system firmware.
We recently ran into this issue on several laptops after Microsoft’s rollout of the new Windows UEFI CA 2023 Secure Boot certificates. The affected systems had already received the updated Windows bootloader, but the corresponding certificate was missing from the UEFI Secure Boot database.
This prevents the firmware from verifying the bootloader’s digital signature. With Secure Boot enabled, the firmware treats the bootloader as untrusted and stops the boot process.
In this guide, we’ll explain why the Invalid Signature Detected error occurs and how to restore the required certificates using Microsoft’s Secure Boot Recovery tool.
What Does “Invalid Signature Detected” Mean?
The full error may look similar to this:
Security Boot Violation
Invalid signature detected. Check Secure Boot Policy in Setup.
The exact wording depends on your PC manufacturer and UEFI firmware.
This error means that Secure Boot cannot verify the digital signature of a boot file.
Secure Boot is designed to prevent unauthorized or modified software from running during the early stages of the boot process. Before Windows starts, the UEFI firmware checks the signature of the Windows bootloader against certificates stored in the firmware’s Secure Boot database.
If the certificate required to validate the bootloader is missing, the firmware blocks the boot process.
Why Is Windows Showing the Invalid Signature Error?
The problem is usually caused by a mismatch between the certificate used to sign the Windows bootloader and the certificates stored in the UEFI firmware.
Microsoft has been transitioning supported Windows devices to the Windows UEFI CA 2023 certificate. Windows updates can install a newer version of the Windows Boot Manager that is signed using this certificate.
Normally, the process works automatically. However, problems can occur when the Windows bootloader has been updated but the corresponding certificate is no longer present in the firmware’s Secure Boot database.
For example, this can happen when:
- Secure Boot certificates were manually removed from UEFI.
- The UEFI firmware was updated or reset.
- UEFI settings were restored to factory defaults.
- The motherboard firmware was replaced.
- UEFI NVRAM was cleared.
- A CMOS battery failure or replacement caused firmware settings to be reset.
In our case, several Razer Blade laptops were affected after their UEFI NVRAM contents were cleared.
What Happens During the Boot Process?
When Secure Boot is enabled, the boot process roughly works like this:
- The PC starts and initializes UEFI firmware.
- UEFI checks the Windows Boot Manager.
- The firmware verifies the bootloader’s digital signature.
- UEFI compares the signing certificate against its Secure Boot database.
- If the certificate is trusted, Windows Boot Manager is allowed to run.
- If the signature cannot be validated, UEFI blocks the boot process.
The problem occurs when the Windows bootloader has been updated to a version signed by Windows UEFI CA 2023, but that certificate is missing from the firmware’s Secure Boot db.
The result is the Invalid Signature Detected error.
Symptoms
A typical affected system behaves like this:
- Secure Boot is enabled in UEFI.
- Windows Boot Manager does not start.
- The screen displays an error such as:
Invalid Signature Detected. Check Secure Boot Policy in Setup.The exact message can differ between manufacturers because each vendor uses its own UEFI interface and error screen.
If you temporarily disable Secure Boot in UEFI, Windows will often boot normally. This happens because the firmware no longer performs the Secure Boot signature check.
However, disabling Secure Boot should be considered a temporary workaround, not the preferred solution. It reduces protection against unauthorized or modified boot components.
Windows UEFI CA 2023 and the Updated Windows Bootloader
Microsoft’s transition to the Windows UEFI CA 2023 certificate is at the center of this issue.
Supported Windows devices are being updated with the new Secure Boot certificates. The certificates are stored in the UEFI firmware’s Secure Boot signature database, commonly referred to as db.
At the same time, Windows can receive an updated Windows Boot Manager file:
bootmgfw.efiThis file is normally located on the system’s EFI partition.
When Secure Boot is enabled, UEFI checks the signature on bootmgfw.efi before allowing the file to execute.
If the bootloader is signed with a certificate that exists in the firmware’s trusted database, the signature is accepted.
If the certificate is missing, the firmware cannot establish trust and blocks the bootloader.
The Problem in Simple Terms
Think of the process as a security check:
Windows Boot Manager: “I am signed by Windows UEFI CA 2023.”
UEFI firmware: “I don’t have that certificate in my trusted database.”
Secure Boot: “Signature cannot be verified. Boot blocked.”
That is why a perfectly legitimate Windows bootloader can trigger the Invalid Signature Detected error.
Can Disabling Secure Boot Fix the Problem?
Yes, disabling Secure Boot can allow Windows to start because the firmware stops enforcing the bootloader signature check.
However, this is not the best permanent solution.
Secure Boot provides an important layer of protection during the boot process. Leaving it disabled means the system loses that protection.
If possible, restore the missing Windows UEFI CA 2023 certificate and re-enable Secure Boot.
Ways to Fix “Invalid Signature Detected”
There are three main approaches.
1. Temporarily Disable Secure Boot
You can enter the UEFI firmware settings and disable Secure Boot.
This may allow Windows to boot normally, but it does not correct the underlying certificate problem.
Use this method mainly as a temporary way to regain access to Windows.
2. Update the UEFI Firmware
Check your computer or motherboard manufacturer’s website for a newer UEFI firmware version that supports the Windows UEFI CA 2023 certificates.
This can be a good long-term solution, but firmware updates require care. An interrupted or incorrect firmware update can cause additional problems.
3. Restore the Certificates With Microsoft Secure Boot Recovery
Microsoft provides the Secure Boot Recovery tool, SecureBootRecovery.efi, which can update the Secure Boot certificate database from outside the normal Windows boot process.
For systems affected by a missing Windows UEFI CA 2023 certificate, this can be a practical way to restore the required certificate without performing a full UEFI firmware update.
The remainder of this guide explains this method.
How to Add Windows UEFI CA 2023 Certificates to UEFI NVRAM
The basic idea is to create a small FAT32 USB drive containing Microsoft’s SecureBootRecovery.efi tool.
The tool is renamed to bootx64.efi and placed in the standard UEFI boot path:
EFI\BOOT\bootx64.efiWhen the system boots from the USB drive with Secure Boot enabled, UEFI loads the recovery tool. The tool checks the Secure Boot certificate database and updates it if the required Microsoft certificate is missing.
Before You Start
You will need:
- A USB flash drive
- Access to the affected Windows PC, either by temporarily disabling Secure Boot or using another working Windows PC
- A supported, fully updated Windows installation
- Administrator access
- Access to the UEFI firmware settings
Important: Be extremely careful when using diskpart. Selecting or formatting the wrong disk can erase data from another drive.
1. Temporarily Disable Secure Boot
Enter your computer’s UEFI firmware settings and temporarily disable Secure Boot.
The exact procedure varies by manufacturer. After disabling Secure Boot, save the settings and allow Windows to boot.
Once Windows starts, you can verify the certificate configuration.
2. Check Whether Windows UEFI CA 2023 Is Missing
Open PowerShell as Administrator and run:
[System.Text.Encoding]::ASCII.GetString((Get-SecureBootUEFI -Name db).Bytes) -match "Windows UEFI CA 2023"If the command returns:
Falsethe Windows UEFI CA 2023 certificate is not present in the Secure Boot database.
If it returns True, the certificate is already present and this particular certificate mismatch is probably not the cause of the boot failure.
3. Check the Windows Bootloader Certificate
Next, check which certificate was used to sign the Windows Boot Manager.
The bootmgfw.efi file is stored on the hidden EFI system partition.
First, identify the drive letter assigned to the EFI partition. In this example, it is E:.
Run:
Get-PfxCertificate -FilePath "E:\EFI\Microsoft\Boot\bootmgfw.efi" |
    Format-List Subject, Issuer
Check the certificate information displayed by PowerShell.
If the bootloader is signed using the Windows UEFI CA 2023 certificate while the firmware’s Secure Boot database does not contain that certificate, you have the certificate mismatch described in this guide.
4. Prepare the USB Flash Drive
Connect a USB flash drive to the computer.
The drive needs to contain a FAT32 partition. The following example uses diskpart.
Open an elevated Command Prompt or PowerShell window and start DiskPart:
diskpartThen list the available disks:
list diskIdentify the USB drive carefully.
In this example, the USB drive is Disk 2:
sel disk 2List its partitions:
list partSelect the appropriate partition:
sel part 1Format it as FAT32:
format fs=fat32 quickAssign a drive letter:
assign letter=GThen exit DiskPart:
exitWarning: DiskPart operates directly on storage devices. Make absolutely certain that you selected the USB flash drive before formatting it.
5. Create the UEFI Boot Directory
Create the standard UEFI boot directory on the USB drive:
mkdir G:\EFI\BOOT -ForceUEFI systems look for boot files in this standard directory when booting removable media.
6. Copy SecureBootRecovery.efi
On an updated Windows installation, Microsoft’s recovery tool can be located in:
C:\Windows\Boot\EFI\Copy it to the USB drive:
copy C:\Windows\Boot\EFI\SecureBootRecovery.efi G:\EFI\BOOT\The file can also be copied from another supported and fully updated Windows computer if necessary.
7. Rename the Recovery Tool
UEFI normally looks for the default x64 removable-media boot file:
bootx64.efiNavigate to the USB directory:
cd G:\EFI\BOOTRename the Microsoft recovery tool:
ren .\SecureBootRecovery.efi bootx64.efiThe final USB directory should look like this:
G:\EFI\BOOT\bootx64.efi8. Re-Enable Secure Boot and Boot From USB
Restart the affected computer and enter the UEFI firmware settings.
Turn Secure Boot back on.
Then select the USB flash drive as the boot device. Depending on your firmware, you may need to open the one-time boot menu and select the USB drive as a UEFI device.
The important part is that the system must boot the USB in UEFI mode with Secure Boot enabled.
9. Run Microsoft Secure Boot Recovery
When the system boots from the USB drive, UEFI should load:
EFI\BOOT\bootx64.efiThis is actually Microsoft’s SecureBootRecovery.efi tool that you renamed in the previous step.
The tool checks the Secure Boot certificate configuration stored in UEFI NVRAM.
If the required Windows UEFI CA 2023 certificate is missing, it updates the Secure Boot database.
A successful run should display messages similar to:
Microsoft Secure Boot Recovery Version 1.0

Checking Secure Boot Certificate Configuration...

Updating the Security Certificate database with the Microsoft UEFI 2023 certificate.

Secure Boot Certificate database successfully updated.

System will reboot in 10 seconds.
The exact wording or version information may change as Microsoft updates the recovery tool.
10. Remove the USB Drive and Boot Windows
After the recovery tool finishes, allow the computer to restart.
Remove the USB flash drive so that the system does not boot into the recovery tool again.
Enter the UEFI settings if necessary and make sure Windows Boot Manager is the first boot option.
Save the settings and restart.
Windows should now boot with Secure Boot enabled.
11. Verify the Certificate Installation
Once Windows starts, open PowerShell as Administrator again.
Run:
[System.Text.Encoding]::ASCII.GetString((Get-SecureBootUEFI -Name db).Bytes) -match "Windows UEFI CA 2023"This time, the command should return:
TrueThis confirms that the Windows UEFI CA 2023 certificate is present in the firmware’s Secure Boot database.
You can also check the Secure Boot status in Windows.
Open:
Settings → Privacy & security → Windows Security → Device security
Under Secure Boot information, Windows should report that Secure Boot is enabled and the required certificate updates have been applied.
What If the Problem Happens When Booting a Windows USB?
The same certificate issue can affect Windows installation media.
For example, a Windows installation USB created with Rufus may use a bootloader signed with the Windows UEFI CA 2023 certificate when the corresponding option is selected.
If the Windows UEFI CA 2023 certificate is missing from the firmware’s Secure Boot db, the PC may refuse to boot that USB drive and show an Invalid Signature Detected error.
In that situation, the problem is not necessarily with the USB drive itself. The firmware may simply be unable to validate the signature of its bootloader.
Restoring the required certificate to the UEFI Secure Boot database can resolve the issue.
Secure Boot Certificate Fix: Which Method Should You Use?
| Method | Advantage | Drawback |
|---|---|---|
| Disable Secure Boot | Quick way to boot Windows | Reduces boot security |
| Update UEFI firmware | Manufacturer-supported long-term solution | Firmware updates require care |
| Secure Boot Recovery | Restores the missing certificate without a full firmware update | Requires creating and booting recovery media |
If your hardware manufacturer provides a UEFI update that addresses the Windows UEFI CA 2023 transition, installing that firmware update may be the preferred long-term approach.
If you simply need to restore the missing certificate and the recovery tool is available, Microsoft Secure Boot Recovery provides another option.
The “Invalid Signature Detected. Check Secure Boot Policy in Setup” error does not necessarily mean that Windows is damaged or that the bootloader has been compromised.
In systems affected by the Windows UEFI CA 2023 transition, the error can occur when the Windows Boot Manager has been updated and signed with the new certificate, while that certificate is missing from the UEFI firmware’s Secure Boot database.
Temporarily disabling Secure Boot can get the system running again, but it leaves the underlying problem unresolved.
A better solution is to restore the missing Windows UEFI CA 2023 certificate, either through an appropriate UEFI firmware update or Microsoft’s Secure Boot Recovery tool. Once the certificate is present in the UEFIdb, the firmware can validate the updated Windows Boot Manager and allow Windows to start normally with Secure Boot enabled.