
Using a USB headset with your PlayStation 4 can be a great way to enhance your gaming experience, especially if you already have a quality pair of PC headphones lying around at home. Even basic USB headset models can deliver better audio quality than what you’d get from your TV’s built-in speakers.
And if you opt for more advanced USB headset options, you’ll be treated to more prosperous, more immersive sound that brings your games to life – plus cool RGB lighting effects, too!
The best part is that connecting a USB headset to your PS4 is straightforward. All you need to do is plug it into one of the console’s USB ports, conveniently located on the front, for easy access. These ports can also charge your controller, so you don’t have to worry about running out of juice mid-game.
It’s worth keeping in mind that the PS4 has multiple USB ports available, making it super convenient if you need to keep your controller charged while using a headset or have other accessories connected simultaneously.
With just a few simple steps, you’ll be good to go! So don’t let those excellent headphones go to waste – put them to use on your PS4 and immerse yourself in your games like never before.
- Plug the headset into the console’s external USB port.
- Select which PS4 user will use the headset.
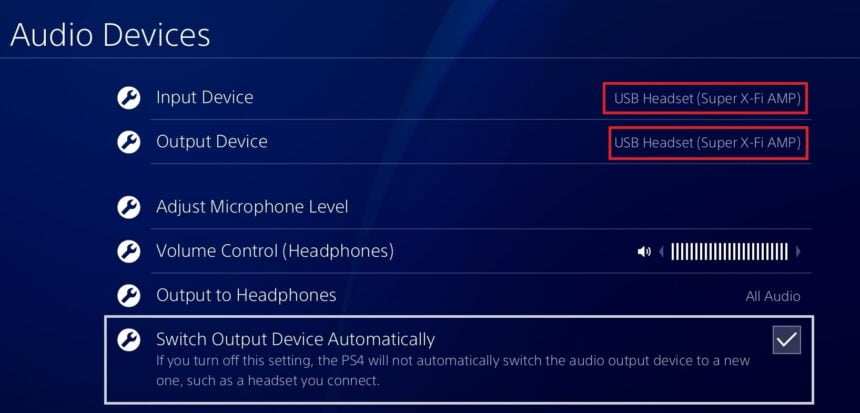
- Go to the “Settings” menu, which a tool case identifies.
- Under “Devices”, select “Audio Devices”.
- Check that the audio input and output options have identified the headset.
- Switch the output to the connected headphones in the “Output to Headphones” option.
If your headset works with the PS4, you’ll hear sound through it. But if it’s incompatible, you might see error messages or not find the device listed in the audio input and output options on the PS4. That means the accessory won’t work with your PlayStation 4.


