
A physical keyboard is usually the easiest way to type on a Windows PC, but there are situations where an on-screen or virtual keyboard can be extremely useful. Your physical keyboard may stop working, you may be using a touchscreen device, or you may simply prefer clicking keys on the screen.
Windows includes a built-in On-Screen Keyboard (OSK) that works with a mouse, touchscreen, pen, or another pointing device. You do not need a touchscreen to use it. Microsoft also provides a separate Touch Keyboard, which is designed primarily for touchscreen and tablet-style devices.
In this guide, you’ll learn how to enable the virtual keyboard in Windows 11 and Windows 10, how to open it quickly with a keyboard shortcut, how to show the Touch Keyboard button on the taskbar, and what to do if the virtual keyboard does not appear.
What Is the Virtual Keyboard in Windows?
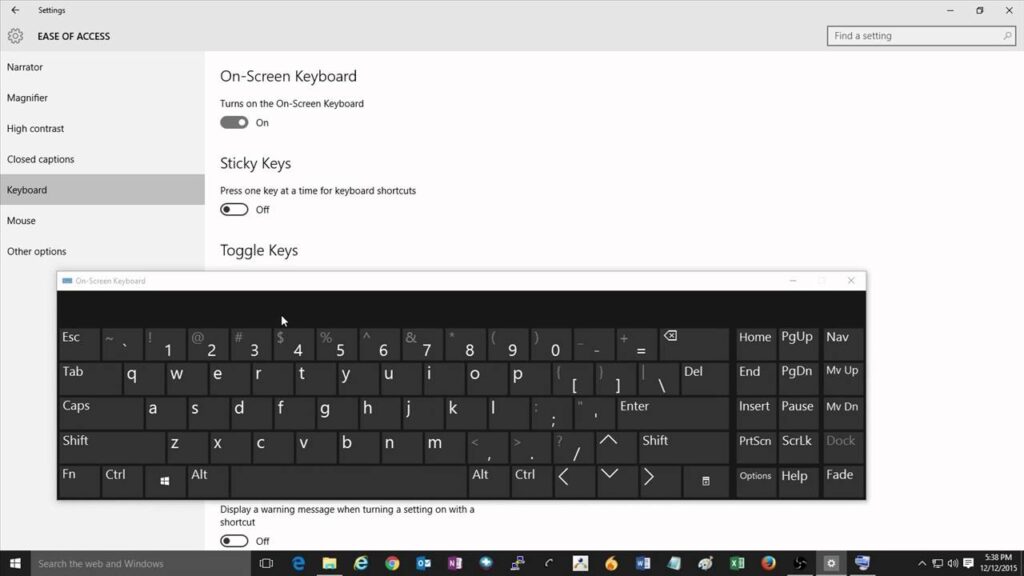
The Windows virtual keyboard is a software-based keyboard displayed directly on your screen.
Microsoft refers to the traditional accessibility keyboard as the On-Screen Keyboard (OSK). It displays standard keyboard keys that you can select using a mouse, touchscreen, pen, or another pointing device.
There is also the Touch Keyboard, which is particularly useful on touchscreen PCs, tablets, and 2-in-1 devices.
Although both allow you to type without using a physical keyboard, they are not exactly the same feature.
On-Screen Keyboard vs. Touch Keyboard
| Feature | On-Screen Keyboard | Touch Keyboard |
|---|---|---|
| Works without a touchscreen | Yes | Yes, depending on the configuration |
| Designed for accessibility | Yes | Primarily touch input |
| Can be opened with shortcut | Yes | Usually accessed from taskbar/input interface |
| Useful when physical keyboard fails | Yes | Yes |
| Works with mouse | Yes | Yes |
| Useful on tablets | Yes | Yes |
| Built into Windows | Yes | Yes |
If your physical keyboard is broken or unavailable, the On-Screen Keyboard is usually the quickest solution.
How to Enable the Virtual Keyboard in Windows 11
Windows 11 provides several ways to enable the virtual keyboard. The easiest method is through Accessibility settings.
1. Enable On-Screen Keyboard Through Settings
Follow these steps:
- Open Start.
- Select Settings.
- Select Accessibility.
- Select Keyboard.
- Find the on-screen keyboard.
- Turn the switch On.
The On-Screen Keyboard should immediately appear on your screen. Microsoft currently lists this as the standard Windows 11 method for opening the OSK.
Once it appears, you can click individual keys using your mouse or another pointing device.
2. Use the Windows Keyboard Shortcut
If you can still use your physical keyboard, there is an even faster method.
Press:
Windows + Ctrl + O
This keyboard shortcut turns the On-Screen Keyboard on or off.
This is especially useful when you need the virtual keyboard temporarily and do not want to navigate through Windows Settings.
Quick Shortcut
Win + Ctrl + O → Toggle On-Screen Keyboard
Remembering this shortcut can be helpful if your physical keyboard is partially working but a particular key is damaged.
3. Open the On-Screen Keyboard With Search
You can also use Windows Search.
- Open Start.
- Type On-Screen Keyboard.
- Select On-Screen Keyboard from the results.
- The virtual keyboard will appear.
This method is useful when you do not remember the keyboard shortcut.
4. Open the OSK Using Run
Windows also provides a quick Run command.
- Press Windows + R.
- Type:
osk
- Press Enter.
The On-Screen Keyboard should open immediately.
This is particularly useful for troubleshooting because you can launch the OSK without navigating through several Settings menus.
How to Enable the Virtual Keyboard in Windows 10
Windows 10 also includes the built-in On-Screen Keyboard.
The Settings interface is different from Windows 11, but the feature works in a similar way.
1. Enable On-Screen Keyboard Through Settings
Follow these steps:
- Open Start.
- Select Settings.
- Open Ease of Access.
- Select Keyboard.
- Find Use the On-Screen Keyboard.
- Turn the option On.
The On-Screen Keyboard will appear on your screen. Microsoft documents this as the Windows 10 method for enabling the feature. While others steps are same as windows 11.
Note: Microsoft ended support for Windows 10 on October 14, 2025. The operating system can continue to run, but Microsoft no longer provides normal free Windows Update security fixes and technical support for Windows 10.
How to Show the Touch Keyboard on the Windows Taskbar
If you use a touchscreen Windows device, you may prefer having a dedicated Touch Keyboard button on the taskbar.
On supported versions of Windows, you can configure the Touch Keyboard icon to appear:
- Always
- When no physical keyboard is attached
- Never
Microsoft documents these options for Windows 11 and Windows 10.
Show the Touch Keyboard Button in Windows 11
Try the following:
- Right-click an empty area of the taskbar.
- Open Taskbar settings.
- Find the System tray icons section.
- Locate Touch keyboard.
- Choose Always if you want the keyboard icon permanently visible.
You can then select the keyboard icon in the system tray to open the Touch Keyboard.
If you only want the icon when no physical keyboard is connected, select the option that displays it when no keyboard is attached.
How to Automatically Show the Touch Keyboard
Windows can be configured to automatically show the Touch Keyboard in certain tablet and touchscreen scenarios.
This can be particularly useful if you regularly use a 2-in-1 computer without a physical keyboard.
The exact behaviour depends on your Windows version, device configuration, and whether a physical or Bluetooth keyboard is connected. Microsoft notes that the attached keyboard can be wired or wireless (Bluetooth), depending on whether Windows determines it to be a Touch Keyboard.
How to Add a Numeric Keypad to the On-Screen Keyboard
The Windows On-Screen Keyboard can also provide a numeric keypad.
With the OSK open:
- Select Options.
- Look for the option to Turn on numeric key pad.
- Enable it.
- Close the Options window.
The numeric keypad can be useful when entering numbers, working with spreadsheets, or using applications that require numeric-keypad input. Microsoft documents this option as part of the OSK’s available settings.
How to Enable the Virtual Keyboard From the Sign-In Screen
You can also use the On-Screen Keyboard before signing into Windows.
This is particularly helpful if your physical keyboard is not working and you need to enter your password or PIN.
At the Windows sign-in screen:
- Look at the lower-right corner.
- Select the Accessibility button.
- Select On-Screen Keyboard.
- Use the virtual keys to enter your credentials.
Microsoft specifically documents the On-Screen Keyboard as an accessibility option available from the Windows sign-in screen.
This can be a lifesaver when your physical keyboard stops working before you can log in.
Frequently Asked Questions
How do I enable the virtual keyboard in Windows?
In Windows 11, go to Settings → Accessibility → Keyboard and turn on On-screen keyboard. You can also press Windows + Ctrl + O to open it.
What is the shortcut for the Windows virtual keyboard?
The shortcut is Windows + Ctrl + O. Pressing the combination toggles the On-Screen Keyboard.
How do I open the on-screen keyboard without a keyboard?
Use your mouse to open Settings → Accessibility → Keyboard, then turn on On-screen keyboard. You can also open Windows Search with the mouse and search for On-Screen Keyboard.
Can I use the virtual keyboard without a touchscreen?
Yes. The Windows On-Screen Keyboard does not require a touchscreen. You can use a mouse or another pointing device to select the keys.
How do I show the keyboard on my Windows taskbar?
On supported Windows versions, open Taskbar settings, locate the Touch keyboard option, and choose Always if you want the keyboard icon to remain visible.
How do I enable the keyboard on the Windows login screen?
At the sign-in screen, select the Accessibility button in the lower-right corner and choose On-Screen Keyboard.
Is the Windows virtual keyboard free?
Yes. The On-Screen Keyboard and Touch Keyboard are built into Windows, so you do not need to install a separate keyboard application.